× Overview
Browser Cookies and Caching Domain Limiting Content Blocking Inactivity Timeout Screen Brightness User Interface Navigation Management iCloud QR and Bar Code Reader
iOS Settings In-App Settings iCloud Sync Mobile Device Management
Content Types Kiosk Modes Offline Mode
Console Debugging Safari Developer Tools Debugging FAQ
Business iOS Apps | Design | Product Management
 

Overview

This guide provides an overview for the use and configuration of WebFrame Kiosk and WebFrame Pro Kiosk. It also provides guidance for content-specific use cases (websites, web apps, video, etc.). This guide provides step-by-step instructions on pairing WebFrame with either Guided Access Mode or Single App Mode. Finally, it serves as a running list of FAQs from WebFrame users.

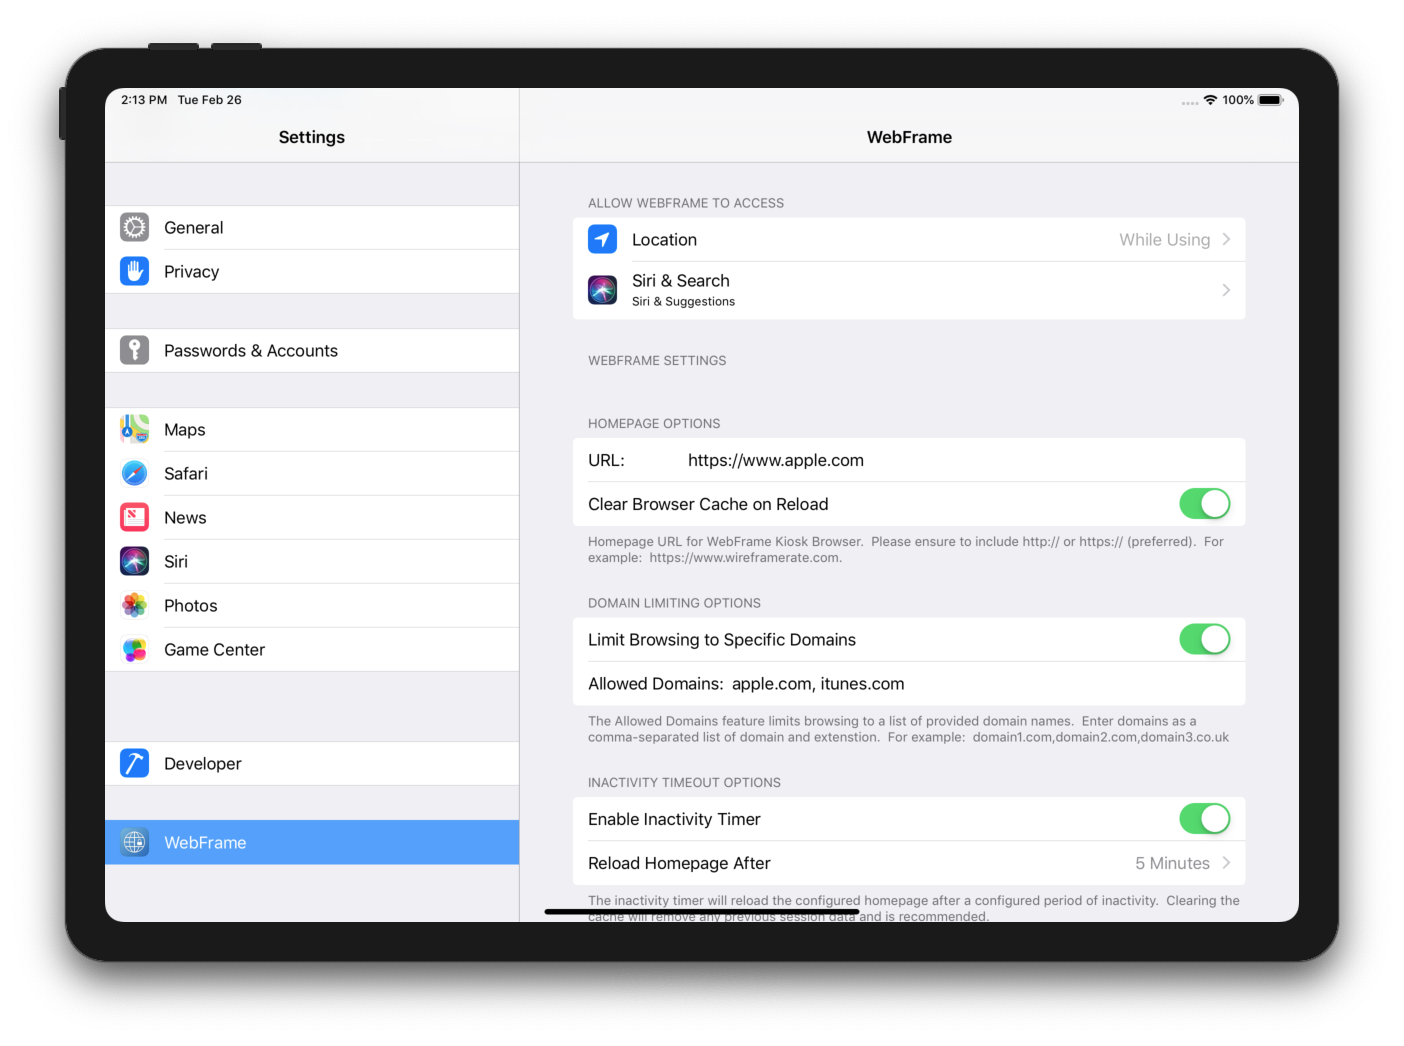
WebFrame is a full-screen kiosk browser for iOS. It is specifically designed to keep users in the experience intended by an administrator. As such, it does not include a navigation bar or in-app settings. All configuration of WebFrame is done either locally through the iOS Settings.app or remotely through an MDM/EMM product like JAMF, VMWare Workspace One, MobileIron, Microsoft Intune, etc.

Compare Editions

WebFrame Basic Kiosk

WebFrame Kiosk

WebFrame Pro Kiosk

Full Screen Browser

Includes banner ad

✔︎

✔︎

Approved Domain List

✔︎

✔︎

✔︎

Inactivity Timeout

✔︎

✔︎

✔︎

QR and Barcode Reader

✔︎

✔︎

✔︎

Smart Navigation Buttons

✔︎

✔︎

✔︎

User Interaction Controls

✔︎

✔︎

✔︎

Local Configuration

✔︎

✔︎

✔︎

iCloud Settings Sync

✔︎

✔︎

✔︎

Offline Support

✔︎

Advanced Content Filtering

✔︎

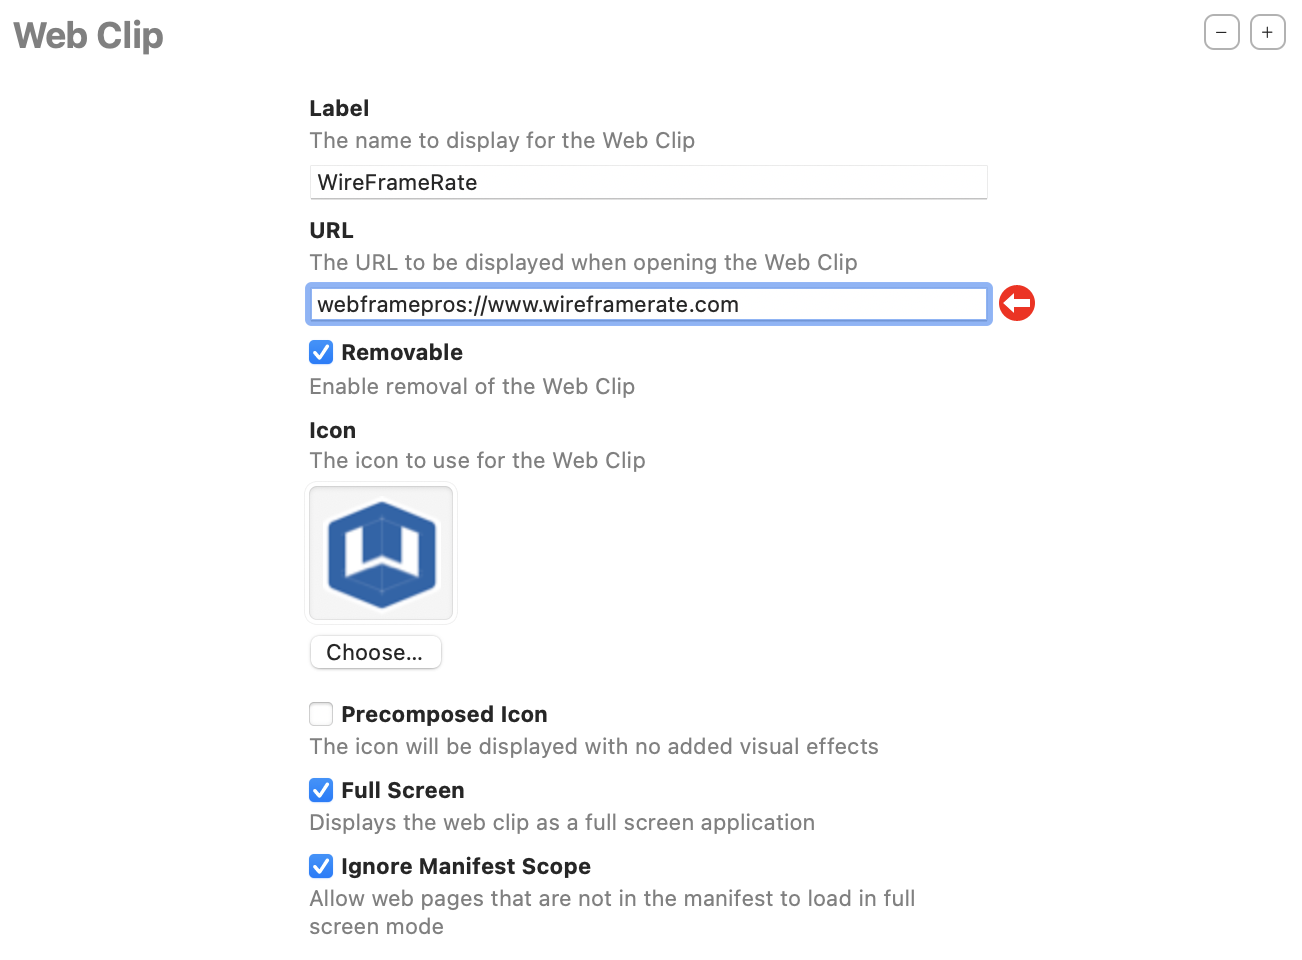
Launch from Web Clip with Custom Icon & App Name

✔︎

Remote Configuration with MDM1

✔︎

Price2

Free

$4.99 (USD)

$9.99 (USD)


TOP

Options

Browser Options

Homepage URL:

The starting point for WebFrame is the Homepage URL. The Homepage URL must be properly formatted according to W3C standards and can include query string parameters and/or file extensions for document and multimedia files. WebFrame supports insecure HTTP websites; however, we recommend using HTTPS whenever possible.

App Launch Behavior:

When WebFrame launches for the first time (for example, after a reboot or force quit), it can be configured to launch into one of two modes: Start New Session instructs WebFrame to launch the Homepage URL, Resume Last Session will cause WebFrame to launch the last page visited before it was closed.

User Agent ID:

User Agent ID is a free-text value that you can use as you sit fit. It will be appended to the end of the browser User Agent String as a means of identifying specific configurations or devices from your existing analytics.

Create Web Archive (Pro, iOS/iPadOS 14+, In-app Settings Only):

If you are deploying kiosks into an environment with unreliable, limited, or no internet connectivity, you may choose to save a page for offline use. Beginning in version 3.0.0, WebFrame Pro provides the ability to save a page as a Web Archive file in iOS 14 and later. If you are running iOS/iPadOS 13.x, please see Offline Configuration below. To save a page as a Web Archive from WebFrame Pro in-app settings, set the page as the Homepage URL, save, then close settings to allow the page to completely load in WebFrame. If the page contains elements that use lazy loading, ensure to scroll or otherwise interact to ensure all necessary elements are loaded and cached so they will be saved into the Web Archive. Re-open in app settings then tap the “Create Web Archive” button.

Web Archives will be automatically saved as hostname.webarchive. For example, if the homepage URL is https://www.apple.com/ipad, then the saved Web Archive will be named “www.apple.com.webarchive”. If more than one archive is created for the same hostname, the filename will be appended with an increment number, for example: www.apple.com-2.webarchive. Archives are saved to the My [iPhone/iPad]\WebFrame Pro folder in Files.

Once the archive is created, you will have the option of setting it as the homepage URL.

Please Note: If the homepage URL is already a Web Archive or any other “file:///” URL, you cannot create a Web Archive.


TOP

Clear Cache on Reload:

To preserve user privacy and provide a pristine environment for each user, you can configure WebFrame to clear any cookies, session state, back/forward lists, or other cached data when the homepage is reloaded. The information will be cleared when the homepage is reloaded through the pull to reload gesture, inactivity timeout, or setting configuration changes.

Clear Cache on Launch:

In addition to clearing cached data when the homepage is reloaded, WebFrame can also be configured to clear locally-cached data when the app launches.

Allow third-party cookies:

By default, WebFrame will only allow cookies from the host domain of the current page. WebFrame can be configured to allow third-party cookies to allow cross-domain tracking. This can be useful if you are creating a kiosk using iFrames that use third-party login providers or other content aggregation.


TOP

DOMAIN LIMITING OPTIONS

WebFrame provides a managed and curated kiosk experience rather than a general purpose browser. However, depending on the website or app configured as the WebFrame homepage, users may still be able to access more of the internet than intended; for example, links to Google or other external websites when using an existing website/app as the WebFrame homepage. Domain limiting is a great way to use an existing website, while ensuring users cannot browse the entire internet from your kiosk. The Domain Limiting Options section configures the list of allowed domains that can be browsed in WebFrame.

Domain Limiting:

Toggles the domain limiting feature on or off. If disabled, users can navigate to any domain. If enabled, users can only browse to sites on domains included in the Allowed Domains list.

Allowed Domains:

Aa comma-separated list of domains and extensions, for example: domain1.com, domain2.com, domain3.net, domain4.co.uk. If your website or app uses a redirector domain, ensure that the redirector domain in included as well. For example: hp.com, hpredirect.com

Users attempting to browse away from allowed domains will be presented with an error message stating that the attempted domain is not allowed.


TOP

CONTENT BLOCKING OPTIONS (WebFrame Pro)

Content Blocking is a feature of WebFrame Pro Kiosk that protects your users’ privacy by blocking tracking cookies, provides a clean user experience by blocking scripts or malicious content including ads, fingerprinting, crypto mining, and more. In addition, you can create your own filter according to Apple guidelines to customize the look and feel of your kiosk homepage. For example, you can use a custom content filter to tailor a general-purpose website into a specific purpose kiosk by hiding page elements such as navigation bars, headers, etc. To create custom filters, customize or replace the custom-filters.json file in the WebFrame Pro folder on the device.

Block Tracking Cookies:

When enabled, blocks cookies from a list of known sources associated with advertising, analytics, content, and social networking.

Block Content & Scripts:

When enabled, blocks scripts and content from am list of known sources associated with advertising, analytics, cryptomining, and fingerprinting.

Block Custom Content:

When enabled, this setting will compile and add the rules stored locally on the device in the \WebFrame Pro\custom-filters.json file.


TOP

INACTIVITY TIMEOUT OPTIONS

Inactivity Timeouts allow you to control user experience and power consumption for kiosks that have been left unattended. The Inactivity Timers begin counting down the moment a user interacts with the screen (tap, swipe, or other gesture). The timers reset with each additional touch.

Disable System Auto-Lock

Disable System Auto-Lock will prevent the iOS system-level screen dimming and locking functionality while WebFrame is running.

Reload Homepage:

The Reload Homepage timer ensures that users are greeted with a fresh environment rather than where the previous user left off. If a user simply walks away from the kiosk, WebFrame will wait the specified amount of time, then reload the configured Homepage URL. When combined with Clear Browser Cache on Reload, the previous session state, cookies, back/forward history, etc. will also be cleared upon timeout. If a user does not interact with the screen for a specified amount of time, the Homepage URL will be reloaded and the process will repeat. Please note that because the timer starts on the first interaction (rather than page load), an unattended kiosk will not endlessly reload the Homepage URL.

Specify the number of minutes the system remains idle before reloading the home page, or 0 to disable the timer.

Dim Screen:

The Dim Screen timer will help preserve power by dimming the screen after the specified number of minutes.

Specify the number of minutes the system remains idle before dimming the screen, or 0 to disable the timer.

Screen Saver:

The Screen Saver timer will help preserve power and prevent screen burn-in by dimming the screen and showing a blank, black screen when the timer expires.

Specify the number of minutes the system remains idle before loading a blank screen saver, or 0 to disable the timer.


TOP

SCREEN BRIGHTNESS OPTIONS

Screen Brightness options allow you to either use system-level screen brightness settings, or app-specific brightness settings. More importantly, these options allow you to remotely manage screen brightness via MDM when WebFrame Pro is configured in Single App Mode.

Use System Brightness:

Configures WebFrame to use system-level brightness settings applied in iOS Settings or Control Center. The Screen Brightness setting will be ignored if Use System Brightness is enabled.

Screen Brightness:

When Use System Brightness is disabled, Screen Brightness will set the screen brightness to the selected value between 10% and 100%. Please note that existing WebFrame Kiosk will return the system to the system-level brightness setting.


TOP

USER INTERFACE OPTIONS

User Interaction:

WebFrame supports interactive kiosks as well as non-interactive information displays. By default, WebFrame is configured for user interaction. However, if you would like a non-interactive kiosk (information display, looping video, etc.), then simply toggle the User Interaction setting.

Scroll and Pan Gestures:

Some user interfaces are better suited for taps only. If this is the case, vertical scrolling and horizontal panning can be disabled with this setting.

Zoom Gestures:

Use this setting to disable pinch and double tap zoom gestures.

Note: There is a known issue that if this setting is toggle off to on, and “Clear Browser Cache on Reload” is disabled, the double tap zoom gesture won’t work until the app is restarted.

JavaScript Popup Boxes:

One of the advantages of WebFrame is that it turn an existing site into a public kiosk without additional development. However, there may be situations where you need to explicitly disable or enable legacy functionality like JavaScript popup dialogs. WebFrame includes support for the three main types of JavaScript popup dialog: Alert, Confirmation, and Prompt. They are enabled by default but can be disabled with the JavaScript Popup Boxes setting.

Allow Printing from Web Page:

Beginning in version 1.4.0, WebFrame supports the HTML window.print() function to allow printing from web pages. To prevent printing, toggle this setting off.

Full Screen Option:

With the introduction of iPhone X, Apple introduced the concept of “Safe Area”, an area of the screen that will not be obscured in any way by the camera sensor array or the rounded edges of the screen. WebFrame supports multiple screen options. The Full Screen Option in WebFrame will allow a user to select Safe Area, Full Screen, Full Screen (Modify Page Viewport), and Disabled (Show Status Bar).

Safe Area is selected by default, forcing WebFrame to comply with the Apple-defined Safe Area with a black border (more on that next) for the areas of the screen outside of the safe area. The black border blends nicely with the physical screen for a seamless edge. See the first image below for an example.

The Full Screen option is great for photographic cover pages or other visually-intensive pages or documents that are better suited for a full screen experience.

Full Screen (Modify Page Viewport), is an advanced option that should only be used in very controlled environments. Modern web technology can detect and enforce its own safe areas, regardless of what has been configured in the browser. For an example, see the third image below. WebFrame has been configured in “Full Screen”. However, the page detects and enforces its own safe area to ensure the navigation items are not obscured by the camera sensor array. If you would like to override that behavior without changing the website, you can choose the “Modify Page Viewport” option in WebFrame to override the settings on the underlying webpage.

Finally, Disabled (Show Status Bar) will prevent WebFrame from going into full screen and will allow the iOS Status Bar to remain visible on iPad and iPhone models without a notch, and the iOS Status Bar and Safe Area padding to remain visible on iPhone models with a notch.

Safe Area (default)

Safe Area (default)

Full Screen with a page that enforces its own safe area viewport

Full Screen with a page that enforces its own safe area viewport

Full Screen (Modify Page Viewport) overriding page safe area constraints

Full Screen (Modify Page Viewport) overriding page safe area constraints

Safe Area Color:

As mentioned above, iPhone X, Xs, Xs Max, and Xr include a “Safe Area” of the screen to ensure controls, branding, or other elements are not obscured by the camera sensor array or the rounded corners of the screen. By default, WebFrame will use a black frame around the edges of the screen. However, the Safe Area Color setting allows an administrator to configure a different color (specified as a six digit RGB hex value) that matches company branding, dominant page colors, etc. For example, see the images with the default frame color (000000) and Starbucks green (0d6343) to match the page branding.

The Safe Area Color setting will also be applied to the iOS Status Bar when the Full Screen option is Disabled (see above).

tfs_safe_area.png

Default Safe Area Color (000000)

Safe Area with Brand Color (0d6343)

Safe Area with Brand Color (0d6343)

Activity Indicator:

Beginning in version 2.1.0, WebFrame and WebFrame Pro Kiosk have been updated to use a small progress bar at the bottom of the screen that shows interactive progress as a page loads. This activity indicator is less intrusive and doesn’t obscure underlying content. It also provides richer detail as the progress bar indicates the percent of a page that is loaded. In some circumstances, for example configurations with poor WiFi coverage, a spinner may still be preferable. In other situations, no activity indicator may provide a better user experience. There is now a configuration option for Activity Indicator: Progress Bar (default), Spinner (legacy), or None.


TOP

There are several options to customize kiosk navigation including gestures and navigation buttons.

Pull to Refresh:

WebFrame supports three different Pull-to-Refresh options. The Pull-To-Refresh gesture can be turned off, refresh the current page, or reload the Homepage URL. If Clear Browser Cache on Reload is enabled, then the Pull-to-Refresh gesture will also clear the browser cache when configured to reload the Homepage URL. The configured action will also be reflected on screen when the user performs the pull gesture as seen below:

Pull to Refresh Current Page

Pull to Refresh Current Page

Pull to Reload Homepage

Pull to Reload Homepage

Swipe Navigation Gestures:

When enabled, this setting will allow a user to swipe right on the screen to go back or swipe left on the screen to go forward. Note that this is only applicable when back or forward navigation is possible and when User Interaction has been enabled in User Interface Options.

Navigation Buttons:

Users that aren’t familiar with iOS devices may not be aware of back/forward swipe gestures. To make navigation more visible and accessible to these users, WebFrame supports Smart Navigation Buttons that will allow for intuitive back/forward navigation. The Smart Navigation Button can be prepositioned around the screen by users. They can also be configured to minimize on scrolling and to only appear when navigation is possible.

To move the Smart Navigation Buttons, a user can tap and hold, then drag the buttons upward or downward on the screen to reposition.

Smart Navigation Buttons Visible and Active

Smart Navigation Buttons Visible and Active

Smart Navigation Buttons being Repositioned

Smart Navigation Buttons being Repositioned

Home Button:

The Home Button functions similar to the Navigation Buttons. It provides a persistent way to navigate to the homepage URL for situations where the site itself doesn’t provide an easy way to start over. It can also be more intuitive for users than the pull-to-refresh gesture.

 
homebutton.png
 

Hide Inactive Buttons:

There are times when navigation is not possible. In such cases, WebFrame Smart Navigation Buttons can be configured to only appear when navigation back or forward is possible. This prevents the interface from being cluttered with unnecessary buttons.

Smart Navigation Buttons with Inactive Buttons Hidden

Smart Navigation Buttons with Inactive Buttons Hidden

smart_nav_buttons_visibile_inactive.png

Smart Navigation Buttons with Inactive Buttons Visible

Minimize Buttons on Scroll:

WebFrame will minimize Smart Navigation Buttons to a partially visible state as the user scrolls in order to provide a full screen experience. This behavior can be turned off to force the navigation buttons to remain fully visible.

 
Smart Navigation Buttons Minimized

Smart Navigation Buttons Minimized


TOP

Management Options

App Launch Mode:

Beginning in WebFrame and WebFrame Pro 2.0.0, the app can be configured to run either as a Kiosk or as a Management app. Management mode has been designed to be used in conjunction with iCloud Sync. When connected to iCloud, one device configured in Management Mode can be used as a console to manage multiple devices configured as kiosks. WebFrame Pro, beginning in version 3.0.0, also supports Autonomous Single App Mode (ASAM). ASAM configures a device with a single app kiosk similar to Guide Access Mode or traditional Single App Mode. However, rather than requiring Apple Configurator or mobile device management to exit single app mode, the kiosk app itself can start or stop single app mode. This allows a device to be configured as a single-app kiosk while allowing employees to exit the single app and access additional apps on the device.

Open Settings with Gesture:

By default, the only way to access settings in WebFrame is through iOS Settings.app. Management mode was added in v2.0.0. Beginning in v3.0.0, in-app settings can be accessed when WebFrame is configured to launch in kiosk (or ASAM) mode. Once enabled, in-app settings can be accessed with a four-finger double-tap gesture.

Settings Passcode:

In order to protect settings from being changed by users, in-app settings can be locked with a passcode. Passcode can be a combination of letters, numbers, special characters, etc. To prevent dictionary attacks, incorrect passcodes can only be entered 10 times before in-app settings will be locked. If in-app settings are locked, the passcode always be reset by iOS Settings.

Note: Passcode is not stored on device unless the passcode is being set by MDM. Once set, passcode setting is cleared and login validates against a one-way hash of the passcode.


TOP

iCloud Options

iCloud Sync Enabled:

Also added to WebFrame and WebFrame Pro version 2.0.0, iCloud Sync allows you to sync settings between all devices logged into the same iCloud account. This will allow remote management of multiple devices without relying on a third-party mobile device management (MDM) product. For more details, see iCloud Sync Configuration below.

Sync Settings to iCloud on Next Run (Only available through Settings.App):

If you are syncing settings to iCloud and managing WebFrame or WebFrame Pro through the iOS Settings app, toggle “Sync Settings to iCloud on Next Run” to update settings the next time WebFrame or WebFrame Pro runs. Once settings have been updated in iCloud, WebFrame will switch this back to “Off”.

Note: When using Management Mode, this setting is not shown. This is because it is not necessary. After making setting changes, simply click “Save” on the Settings screen to update settings on iCloud.

iCloud Status (Only available through in-app settings):

In Management Mode, iCloud Status will provide information on the status of the iCloud account logged into the device.

Erase iCloud Data (only available through in-app settings):)

In the event of synchronization problems, an administrator can use the “Erase iCloud Data” button in Management Mode to delete all WebFrame settings from the logged-in iCloud account.


TOP

QR and Bar Code Reader

WebFrame includes a QR and Bar Code Reader that can be instantiated from JavaScript on a webpage. The reader accepts a string input to define the default camera (either ‘front’ or ‘rear’). When a code is successfully read, it will call a JavaScript function named ‘handleQRData(returnedString)’ that will provide the string read from the code. It is up to the developer to parse this string and act on it.

The QR code reader allows the user to switch between front and rear cameras. The reader will close once a code is successfully read or if the user taps the close button.

Example code:

<h3>QR Reader Test</h3>
<Button onClick="myQRScan('front')">Read Front QR Code</Button>
<Button onClick="myQRScan('rear')">Read Rear QR Code</Button>
<script>
    function myQRScan(cameraName) { 
        //This postMessage call will instantiate the QR code reader.  cameraName should specify either 'front' or 'rear'
        window.webkit.messageHandlers.readQRCode.postMessage({defaultCamera: cameraName});
    }
    // This function MUST be included in your JavaScript.
    function handleQRData(returnedString) {
        // Process returnedString based on your use case
        ... 
    }
</script>

TOP

Management

iOS Settings

WebFrame Pro can be completely configured in the iOS Settings.app. To configure, open Settings then navigate to the WebFrame, WebFrame Basic, or WebFrame Pro section.


local_settings_iphone.png
 
local_settings_ipad.png
 

TOP

In-App Settings

In addition to Settings.app, for added convenience WebFrame can also be managed in-app. In-app settings can be accessed either through Management Mode, or through a four-finger double-tap gesture. To enable Management Mode or the settings gesture, please see Management Options in this guide.


settingsview_render_iphone.png
settingsview_render_ipad.png
 

TOP

iCloud Sync

ICLOUD SYNC CONFIGURATION:

Beginning in version 2.0.0, all WebFrame products can synchronize settings with iCloud. This provides the ability to manage multiple devices remotely, provided that they are all logged into the same iCloud account.

Settings can be synchronized in one of two ways:

  1. Peer-to-peer through the iOS Settings app.

  2. Dedicated “Management” device running WebFrame in Management mode.

 
iCloudRender.png
 

Requirements:

1) Sign into iCloud: In order to use iCloud Sync, devices must first be logged into an iCloud account. In the master view of iOS Settings, an account or a prompt to sign into an account will be shown. Ensure all devices that are to be synchronized are signed into the same account.

 
If this prompt is visible, the device is not signed into an iCloud account.

If this prompt is visible, the device is not signed into an iCloud account.

 
This indicates that the device is signed into an iCloud account.

This indicates that the device is signed into an iCloud account.


2) Enable iCloud Drive and WebFrame/WebFrame Pro: Not all iCloud services are required in order to sync WebFrame settings via iCloud. At a minimum, iCloud Drive and WebFrame or WebFrame Pro must be enabled in order to sync settings between devices. To ensure the proper services are enabled, go to Settings > iCloud Account > iCloud and scroll down until you see “iCloud Drive”.

 
iCloud Drive and WebFrame and/or WebFrame Pro should be enabled in order to sync settings with iCloud.

iCloud Drive and WebFrame and/or WebFrame Pro should be enabled in order to sync settings with iCloud.


Please note: You may have to enable iCloud Sync in WebFrame and run it before it will show up in the list of iCloud-enabled services (see below).

3) Enable iCloud Sync in WebFrame: Finally, in iOS Settings, scroll down to WebFrame or WebFrame Pro in the master view, then in the detail view scroll down to “Management Options” and turn on the “iCloud Sync Enabled” setting.

 
icloud-sync-enabled.png
 

Synchronizing Settings:

Sync with iCloud using Settings.App

As with previous versions of WebFrame, settings can be managed using the iOS Settings app. However, if iCloud Sync is enabled, after changes are made, the “Sync Settings to iCloud on Next Run” setting should be toggled to the “On” position. The next time WebFrame runs, any setting changes will be applied locally and synchronized to iCloud. Otherwise, settings will only be applied locally, which will then be overridden by the existing iCloud settings.

 
icloud-sync-on-next-run.png
 

Sync with iCloud using WebFrame Management Mode:

When using Management Mode, the “Sync Settings to iCloud on Next Run” setting is not present because it is not required. After making setting changes then clicking the “Save” button, settings will be applied both locally and to iCloud.

Erase iCloud Data:

In the event that there are synchronization issues between devices, the “Erase iCloud Data” button available through in-app settings will erase all settings from iCloud.

 
iCloud Section of In-App Settings

iCloud Section of In-App Settings

Alert When iCloud Settings are Cleared

Alert When iCloud Settings are Cleared


Caveats and Warnings:

WebFrame is entirely dependent upon iCloud for synchronization timing and reliability. . If iCloud services are experiencing performance or other issues, it could impact WebFrame setting synchronization.


TOP

Mobile Device Management (WebFrame Pro)

MOBILE DEVICE MANAGEMENT (MDM) CONFIGURATION:

WebFrame Pro Kiosk is compatible with the AppConfig standard. Any modern MDM/EMM product that supports AppConfig (JAMF, VMWare Workspace One, MobileIron, Microsoft Intune, etc.) can deploy and manage WebFrame Pro.

Each MDM solution manages applications slightly differently. In general, WebFrame Pro will be deployed using Apple’s Volume Purchase Program (VPP) and managed through a managed app profile or policy. Some examples are included below:


App Configuration Policy in JAMF

App Configuration Policy in JAMF


AppConfig Settings Reference:

Full Key/Value Pairs List
    Browser Options
    • com.wireframerate.webframepro.homepage_url (String):
      Kiosk homepage as a string. For example: https://www.mydomain.com
      Default value: https://www.wireframerate.com/product-tour
    • com.wireframerate.webframepro.clear_cache_enabled (Bool):
      Clears browser cache when the idle timer reloads the homepage URL.
      Default value: True
    • com.wireframerate.webframepro.clear_cache_on_launch_enabled (Bool):
      Clears browser cache when the app launches.
      Default value: True
    • com.wireframerate.webframepro.third_party_cookies_enabled (Bool):
      Enables cross-domain, third-party cookies to be persisted.
      Default value: False
    • com.wireframerate.webframepro.custom_url_scheme_enabled (Bool):
      Enables the “webframepro:htps://…” custom URL scheme.
      Default value: False
    Domain Limiting Options
    • com.wireframerate.webframepro.domain_limiting_enabled (Bool):
      Limit navigation to a predefined list of allowed domains.
      Default value: True>
    • com.wireframerate.webframepro.domain_allowed_list (String):
      Comma-delimited string of domain names. For example: domain1.com,domain2.com,domain3.co.uk
      Default value: wireframerate.com
    Content Blocking Options
    • com.wireframerate.webframepro.block_cookies_enabled (Bool):
      Enable/disable blocking tracking cookies.
      Default value: False
    • com.wireframerate.webframepro.block_content_enabled (Bool):
      Enable/disable blocking tracking content/scripts.
      Default value: False
    • com.wireframerate.webframepro.block_custom_enabled (Bool):
      Enable/disable custom content blocking rules defined in custom-filters.json.
      Default value: False
    Inactivity Timer Options
    • com.wireframerate.webframepro.auto_lock_disabled (Bool):
      Disable iOS system level screen dim/lock functionality.
      Default value: False
    • com.wireframerate.webframepro.idle_timeout_seconds (Integer):
      Number of seconds before an idle device reloads the homepage URL.
      Default value: 300

      This setting is depricated as of WebFrame Pro 3.3.0 and later.
    • com.wireframerate.webframepro.idle_timeout_value (String):
      Number of minutes before an idle device reloads the homepage URL.
      Default value: 5
    • com.wireframerate.webframepro.dim_screen_timeout (String):
      Number of minutes before an idle device dims is screen to 0% brightness.
      Default value: 0
    • com.wireframerate.webframepro.screen_saver_timeout (String):
      Number of minutes before blank screen saver loads.
      Default value: 0
    Display Options
    • com.wireframerate.webframepro.system_brightness_enabled (Bool):
      When enabled, use the system-level brightness set in Settings or Control Center.
      When disabled, use the brightness specifid in system_brightness_level (below).
      Default value: True
    • com.wireframerate.webframepro.screen_brightness_level (Integer):
      The screen brightness level as an integer from 0 - 100.
      Default value: 80
    User Interface Options
    • com.wireframerate.webframepro.user_interaction_enabled (Bool):
      Enable/disable all user interaction.
      Default value: True
    • com.wireframerate.webframepro.scroll_pan_enabled (Bool):
      Enable/disable vertical scroll and horizontal pan gestures.
      Default value: True
    • com.wireframerate.webframepro.zoom_enabled (Bool):
      Enable/disable pinch and double-tap zoom gestures.
      Default value: True
    • com.wireframerate.webframepro.drag_drop_enabled (Bool):
      Enable/disable HTML 5 drag-and-drop.
      Default value: False
      Note: Enabling drag-and-drop opens up a potential security vulnerability because it allows opening a link in Safari via multitasking. However, some websites require drag-and-drop in order to work properly, so we have added this setting.
    • com.wireframerate.webframepro.javascript_popups_enabled (Bool):
      Enable/disable JavaScript popup dialog boxes.
      Default value: True
    • com.wireframerate.webframepro.print_enabled (Bool):
      Enable/disable printing from HTML window.print().
      Default value: True
    • com.wireframerate.webframepro.full_screen_option (Integer):
      Configures the full screen option of the view. 0 for Safe Area constraints, 1 for full screen, 2 for full screen with page viewport overrides, and 3 for disabled allowing a visible Status Bar.
      Default value: 0 (Safe Area)
    • com.wireframerate.webframepro.safe_area_color (String):
      Six-digit hex code specifying the color for the screen above the Safe Area constraints. Must begin with ‘#’ (for example: #C19304).
      Default value: #000000
    • com.wireframerate.webframepro.activity_indicator_option (String):
      Configures the activity indicator displayed when a page is loading. 0 for progress bar, 1 for spinner, and 0 for no activity indicator.
      Default value: 0 (Progress Bar)
    Navigation Options
    • com.wireframerate.webframepro.pull_to_refresh_action (Integer):
      Configures the “pull-to-refresh” action. 0 for off, 1 to refresh the current page, 2 to reload homepage.
      Default value: 0 (Off)
    • com.wireframerate.webframepro.swipe_navigation_enabled (Bool):
      Enable/disable swipe gestures for browser back/forward.
      Default value: True
    • com.wireframerate.webframepro.navigation_buttons_enabled (Bool):
      Enable/disable Back and Forward Smart Navigation Buttons.
      Default value: False
    • com.wireframerate.webframepro.home_button_enabled (Bool):
      Enable/disable Home Smart Navigation Button
      Default value: False
    • com.wireframerate.webframepro.navigation_buttons_autohide (Bool):
      When enabled, Smart Navigation Buttons will be hidden when inactive. When disabled, buttons will always be visible.
      Default value: True
    • com.wireframerate.webframepro.navigation_buttons_minimize (Bool):
      When enabled, Smart Navigation Buttons will minimize on scroll. When disabled, buttons will not minimize.
      Default value: False
    Management Options
    • com.wireframerate.webframepro.app_launch_mode (Integer):
      Configures the launch mode of the app. 0 launches the app as a kiosk, 1 launches the app as a management console, and 2 will launch as a kiosk is autonomous single app mode.
      Default value: 0 (Kiosk Mode)
    • com.wireframerate.webframepro.settings_gesture_enabled (Bool):
      When enabled, a four-finger double-tap gesture will open in-app settings.
      Default value: False
    • com.wireframerate.webframepro.settings_javascript_enabled (Bool):
      When enabled, in-app settings can be opened with the "openWFSettings" JavaScript command.
      Default value: False
    • com.wireframerate.webframepro.passcode (String):
      Locks in-app settings with specified passcode.
      Default value: [Blank]
Example XML/plist

Several MDM products allow an administrator to import and AppConfnig plist file. This file can be generated by hand from the example XML above or, much easier, by the AppConfig Generator provided by JAMF.

To use the AppConfig generator:

  1. Download the “Specfile” for WebFrame Pro Kiosk

  2. Specify the downloaded file in Step 1 of AppConfig Generator and click “Upload”

  3. When the file has uploaded, click “Configure”

  4. Configure desired WebFrame Pro options

  5. Click “Submit”

  6. You can then download the generated PLIST file and upload it into your MDMs AppConfig settings or copy-paste the PLIST contents into the AppConfig text field (e.g. JAMF)

Web Clips (WebFrame Pro)

Web Clips allow you to create a Homescreen item with a custom icon and name that will launch WebFrame Pro and load either the pre-configured homepage or a URL specified in the Web Clip. When creating a Web Clip, simply replace "https://" or "http://" in the URL with "webframepros://" or "webframepro://" respectively. For example: "webframepros://www.wireframerate.com". To launch the homepage configured in WebFrame Pro, specify "webframepro://home".

Web Clips can be created with an MDM product or Apple Configurator. Be sure to enable “Full Screen” when you create a Web Clip.

 
Web Clip Settings in Apple Configurator

Web Clip Settings in Apple Configurator


TOP

Configuration

Content Types

WEBSITES:

For general websites, simply configure the Homepage URL to the full address of the site. This can include the full address path as well as any query string parameters.

If the site has its own navigation and it is preferable to back/forward navigation, disable swipe gestures and Smart Navigation Buttons.

WEB APPS:

Web apps and Progressive Web Apps are generally handled the same way as websites. Configure the homepage URL to the address of the web app (for example, “https://app.starbucks.com”) and configure user interface and navigation options accordingly.

VIDEO:

There are two options when configuring WebFrame to play video: A URL to a page containing a player (e.g. YouTube), or a direct URL to a video file and extension. In general, we recommend using a webpage such as YouTube, Vimeo or a page you build yourself. This will provide the most flexibility around things like autostart, loop, etc.

YouTube:
To display a full-screen, looping video as digital signage, demo at a trade show, or information kiosk, set the Homepage URL to:

https://www.youtube.com/embed/VIDEO_ID?playsinline=1&controls=0&loop=1&plalylist=VIDEO_ID

Replacing “VIDEO_ID” with the actual YouTube ID of the video. For example:

https://www.youtube.com/embed/uJkOP1-v9B4?playsinline=1&controls=0&rel=0&loop=1&playlist=uJkOP1-v9B4

For a full list of YouTube player parameters, please see YouTube Embedded Players and Player Parameters in the YouTube IFrame Player API documentation.

Please note that some YouTube parameters (such as “autoplay”), do not work on iOS. This is a limitation of iOS (including WebKit and Safari) as a platform and is not specific to WebFrame. Because autoplay does not work on iOS, “Enable User Interaction” should be set to Enabled so that you can start the video initially.

Direct URL:

Because WebFrame is built on WebKit, it supports native HTML video playback. To play a video directly using the iOS native player, specify the video URL as the Homepage for WebFrame. For example:

https://www.apple.com/105/media/us/macbook-air/2018/9f419882_aefd_4083_902e_efcaee17a0b8/films/product/mba-product-tpl-cc-us-2018_1280x720h.mp4


DOCUMENTS:

Generally, to use documents as a kiosk, simply host the document at a publicly accessible URL and set that URL as the Homepage in WebFrame.

Some example files:

INTERACTIVE EXPERIENCES:

There are many tools for creating interactive user experiences without writing code. One such solution is InVision. With InVision, it is possible to create a fully interactive experience then share that experience, or “prototype” with a URL.

To learn more about InVision, see https://www.invisionapp.com. For this guide, we will use an existing sample prototype created by InVision.

Once, a prototype has been created, it can be shared through a link. Simply click the “Share” button at the top of the screen.

At the bottom right corner of the share popup screen, click on “Link Settings”. In the Share Prototype screen, ensure “Allow commenting…” is turned off, “Allow access to all screens…” is turned on, and “Password Protect” is turned off.:

Finally, copy the Private URL and use it as the Homepage URL for WebFrame. Load WebFrame and the InVision prototype will load as an interactive kiosk.


TOP

Kiosk Modes

GUIDED ACCESS MODE:

Guided Access Mode provides an easy and convenient way to lock an iOS device down to a single app without the need for a manageability solution. For detailed information on Guided Access Mode, please refer to this guide from Apple.

To summarize enabling Guided Access Mode:

  1. Go to Settings > General > Accessibility > Guided Access.

  2. Turn on Guided Access.

  3. Tap Passcode Settings, then tap Set Guided Access Passcode.

  4. Enter a passcode, then reenter it. From here, you can also turn on Face ID or Touch ID as a way to end a Guided Access session.

To enable Guided Access Mode with WebFrame to lock down a device:

  1. Open WebFrame, then triple-click the Home button. For newer devices without a home button, triple-click the lock button. 

  2. If you want parts of your screen to stop responding to touch, use one finger to circle those areas. You can move or resize the circle, or tap the X to remove it.

  3. Tap Start

Or to start a Guided Access session with Siri*, open the app that you want, then tell Siri "Turn on Guided Access." 

*Siri features might vary by country or region.

Setup guided access mode in Settings > General > Accessibility > Guided Access

Initiate Guided Access by Launching WebFrame then Triple-Clicking the Home Button (or Lock Button on FaceID Devices), Configuring Options, then Clicking “Start”


SINGLE APP MODE WITH CONFIGURATOR:

Like Guided Access Mode, Single App Mode locks a device down to a single app. Single App Mode adds the additional security of booting directly into the specified kiosk app on restart. In addition, Single App Mode can only be enabled or disabled on a Supervised device by an administrator using Apple Configurator or an approved MDM solution.

Device “Supervision” provides a added layer of manageability and security to iOS devices. There are two ways to make an iOS device Supervised: Apple’s Device Enrollment Program (DEP), or the Apple Configurator app. For information on Supervising an iOS device, please refer to the Apple DEP documentation or the Apple Configurator help documentation.

Once a device is Supervised, it can be put into “Single App Mode” using either Apple Configurator or an MDM solution. To enable Single App Mode with Configurator:

  1. Connect device to a Mac with Apple Configurator installed

  2. Supervise the device according to Apple Configurator instructions

  3. Install WebFrame Kiosk or WebFrame Kiosk Pro

  4. In Apple Configurator, select Supervised from the toolbar

  5. Select the device or devices to be placed in Single App Mode, right click or select Actions from the menu

  6. Choose Advanced > Start Single App Mode…

  7. Browse to or search for then select WebFrame Kiosk or WebFrame Pro Kiosk

  8. Click Options to configure advanced options accessibility features and click Apply [optional]

  9. Finally, click Select App to apply and start Single App Mode

Configurator Supervised Device List

Advanced Menu

Advanced Menu

Single App Mode App Selection

SINGLE APP MODE WITH MDM/EMM:

To enable Single App Mode through MDM, a device must be Supervised and enrolled in MDM. You can use the steps above using Apple Configurator to supervise the device, or you can use Apple Business Manager (replacement for Apple’s Device Enrollment Program). Once Supervised, follow your MDM instructions to enroll the device(s). Once Supervised and enrolled, Single App Mode is typically enabled through a Configuration Profile in MDM.

See the documentation for the specific MDM/EMM solution in use. For this guide, we will provide high-level guidance.

To enable Single App Mode:

  1. If you haven’t already, enroll in the Apple Volume Purchase program at https://business.apple.com/#enrollment

  2. Purchase WebFrame Pro Kiosk for the organization. WebFrame Pro Kiosk is recommended over WebFrame Kiosk because it can be remotely managed.

  3. Log into your MDM/EMM Solution

  4. Follow instructions to add WebFrame Pro Kiosk as a managed app

  5. Configure WebFrame Pro Kiosk to be automatically installed with automatic updates

  6. Modify the WebFrame Pro Kiosk settings as described in the Remote Configuration section of this user guide

  7. Follow instructions to create a new Configuration Profile

  8. Find and select Single App Mode then create/configure the policy

  9. Select iOS as the target operating system

  10. Select WebFrame Kiosk Pro as the single app

  11. Optionally configure additional feature or accessibility settings

  12. Assign the new profile to the appropriate devices and/or groups

  13. Follow instructions for deploying WebFrame Kiosk Pro and the new Configuration Profile

Autonomous Single App Mode (WebFrame Pro):

Autonomous Single App Mode (ASAM) is similar to Single App Mode in that it requires a device to be enrolled in Supervised and enrolled in MDM. However, unlike Single App Mode, ASAM allows a supported kiosk app to start and stop single app mode rather than relying on Configurator or MDM. For example, this would allow you to deploy in-store kiosks running WebFrame as a kiosk in single app mode, but store employees could stop single app mode to access line-of-business or other applications on the iPad, then return to single app mode when they’re done.

See the documentation for the specific MDM/EMM solution in use. For this guide, we will provide high-level guidance.

To enable Autonomous Single App Mode:

  1. If you haven’t already, enroll in the Apple Volume Purchase program at https://business.apple.com/#enrollment.

  2. Purchase WebFrame Pro Kiosk for the organization. WebFrame Pro Kiosk is recommended over WebFrame Kiosk because it can be remotely managed.

  3. Log into your MDM/EMM Solution.

  4. [Optional] Follow instructions to add WebFrame Pro Kiosk as a managed app.

  5. [Optional] Configure WebFrame Pro Kiosk to be automatically installed with automatic updates.

  6. [Optional] Modify the WebFrame Pro Kiosk settings as described in the Remote Configuration section of this user guide.

  7. Follow instructions to create a new Configuration Profile. Some MDM solutions include Single App Mode and Autonomous Single App Mode in the same Configuration Profile. Others, like JAMF, include Autonomous Single Access Mode as an option with Restrictions.

  8. Either select “WebFrame Pro Kiosk” or enter the bundle ID (com.wireframerate.WebFramePro) to enable it for ASAM.

  9. Assign the new profile to appropriate devices and/or groups.

  10. Follow instructions for deploying the new profile.

Configure WebFrame Pro Kiosk:

To support starting/stopping single app mode, WebFrame Pro should have the in-app settings gesture enabled and a passcode should be set. To exit single app mode, open in-app settings, scroll to Management section, and tap “Exit Autonomous Single App Mode”. To restart single app mode, tap “Enter Single App Mode”.

Note: A Device should not be configured for both Single App Mode and Autonomous Single App Mode.


TOP

OFFLINE MODE (WEBFRAME PRO)

Beginning in version 2.1.0, WebFrame Pro can be configured to use files stored locally on device for the homepage URL. This allows for offline use of local html files, offline web archives, documents, etc. Local file storage can be managed with the Files app, AirDrop, or if the device is physically connected to a Mac, through Apple Configurator or Finder. WebFrame Pro can only locate files that are stored in the local WebFrame Pro directory, for example: "On My iPad\WebFrame Pro" or "On My iPhone\WebFrame Pro".

NOTE: THE “WebFrame Pro” FOLDER MUST BE CREATED BY THE APP. INSTALL AND RUN WebFrame Pro AND THE FOLDER WILL BE AUTOMATICALLY CREATED.

ADDING FILES

Files App

  1. When saving files from other apps, select the "Save File To..." action from the share sheet and save the file(s) to the "WebFrame Pro" directory.

  2. If files have already been saved to another location, from the Files app you can

    • Either long-press on a file and choose "Copy" or "Move" from the popup menu, or choose "Select", select file(s) then choose "Move" from the bottom menu bar.

    • Browse to the local device and select the WebFrame or WebFrame Pro directory as the destination.

AirDrop

  1. From Finder on the Mac, select the file or files you would like to use for WebFrame Pro, select "Share\AirDrop" from the right-click (Control-click) menu or "Go" menu.

  2. From the AirDrop dialog, select the desired device.

  3. On the target device, an AirDrop dialog will be displayed. Choose "Open with Files" and save the file(s) to the WebFrame Pro directory.

Apple Configurator

  1. With a target device connected to a Mac, open Apple Configurator.

  2. Select the device.

  3. Right-click (or Control-click) on the device and choose "Add\Documents". Alternatively, you can choose "Add\Documents" from the "Actions" menu.

  4. Select "WebFrame Pro" as the destination then click "Choose".

  5. Select the file(s) to copy, then click "Add" to complete.

Finder

  1. With a target device connected to a Mac, select the device in the "Locations" section of the Finder Sidebar.

  2. From the menu bar, select "Files".

  3. From a second Finder window, drag the desired files to the "WebFrame Pro" folder and allow them to sync to the device.

SAVING A Page FOR OFFLINE USAGE

If you are deploying kiosks into an environment with unreliable, limited, or no internet connectivity, you may choose to save a page for offline use. Safari provides the ability to save a page as a PDF or Web Archive file.

Create a PDF

From Safari on iOS 12:

  1. Load the webpage you would like to cache. If the page uses lazily-loaded elements, be sure to scroll and/or otherwise interact with the page to ensure all elements are loaded.

  2. Tap the Share icon on the navigation bar.

  3. From the bottom row of options on the share sheet, choose "Create PDF".

  4. A PDF will be loaded into a Preview window. From that window, tap the Share icon.

  5. From the bottow for of the share sheet, choose "Save to Files".

  6. Browse to "On my iPad/iPhone" and select the "WebFrame Pro" folder.

  7. Tap "Add"

From Safari on iOS or iPadOS 13:

  1. Load the webpage you would like to cache. If the page uses lazily-loaded elements, be sure to scroll and/or otherwise interact with the page to ensure all elements are loaded.

  2. Tap the Share icon on the navigation bar.

  3. Tap "Options >" item on top row of share sheet.

  4. Choose "PDF" as the "Send As" option.

  5. Tap "Back" button.

  6. Tap "Save to Files" from the share sheet.

  7. Browse to "On my iPad/iPhone" and select the "WebFrame Pro" folder.

  8. Tap "Save"

From Safari on macOS:

  1. Load the webpage you would like to cache. If the page uses lazily-loaded elements, be sure to scroll and/or otherwise interact with the page to ensure all elements are loaded.

  2. From the "File" menu, choose "Export as PDF...".

  3. Enter a file name and location to save the PDF.

  4. Click "Save" button.

  5. Transfer the file to an iOS/iPadOS device using one of the methods outlined above.

Create a Web Archive

From Safari on iOS 12:

*iOS 12 Safari cannot create a web archive, but WebFrame on iOS 12 can still load a web archive created on macOS or iOS/iPadOS 13.

From Safari on iOS or iPadOS 13:

  1. Load the webpage you would like to cache. If the page uses lazily-loaded elements, be sure to scroll and/or otherwise interact with the page to ensure all elements are loaded.

  2. Tap the Share icon on the navigation bar.

  3. Tap "Options >" item on top row of share sheet.

  4. Choose "Web Archive" as the "Send As" option.

  5. Tap "Back" button.

  6. Tap "Save to Files" from the share sheet.

  7. Browse to "On my iPad/iPhone" and select the "WebFrame Pro" folder.

  8. Tap "Save"

From Safari on macOS:

  1. Load the webpage you would like to cache. If the page uses lazily-loaded elements, be sure to scroll and/or otherwise interact with the page to ensure all elements are loaded.

  2. From the "File" menu, choose "Save as...".

  3. Enter a file name and location to save the archive.

  4. For "Format", select "Web Archive".

  5. Click "Save" button.

  6. Transfer the file to an iOS/iPadOS device using one of the methods outlined above.

CONFIGURING WEBFRAME PRO KIOSK

Once content has been copied or created on the device, it can be used as the default homepage for WebFrame Pro. Please note that filenames should NOT include spaces or special characters. Also note that the "WebFrame Pro" folder is considered the root folder or any URL. If you create any subfolders, the URL should start with the subfolder name. For example, to set this page as homepage, set the WebFrame Pro Homepage URL to:

file:///readme.html

If you use subdirectories, file path should begin with the first directory in "WebFrame Pro", for example:

file:///folder/subfolder/default.html

Please note that there are three forward slash characters ('/') following "file:". File file names should be limited to alpha-numeric characters and should not include whitespaces or other special characters.

To configure WebFrame:

  1. Open iOS/iPad OS Settings app.

  2. Scroll to and tap "WebFrame" or "WebFrame Pro"

  3. Tap "Homepage URL:"

  4. Type the URL for the file in the format of "file:///readme.html" (without the quotation marks). Please note that the extention for a Web Archive file is ".webarchive".

  5. Tap "Return" keyboard key.

  6. Launch WebFrame Pro.


TOP

Troubleshooting

Console Debugging

Beginning in version 3.8.0, WebFrame has added JavaScript console output to the app’s own logging messages. These messages are logged to a special “JS Console” category to make them easier to filter and examine. In order to view WebFrame’s log output, you will need to connect your kiosk to a Mac and use the Mac Console application. WebFrame will log console.log(), console.warn(), console.error(), console.debug(), and uncaught JavaScript exceptions.

The following steps will allow you to view your site’s console output:

  1. Connect your WebFrame kiosk device to a Mac using an appropriate cable.

  2. If prompted on the kiosk device, allow the connection to the Mac by tapping the “Trust” button on the security dialog.

  3. Launch Console on a Mac either by opening Spotlight and searching for “Console”, or by opening Finder and going to Applications/Utilities/Console.app.

  4. From the Console menu, choose “Action” and ensure “Include Debug Messages” is checked.

  5. From the “Devices” list on the left side of the Console screen, tap the WebFrame kiosk device.

  6. Next, apply filters to make the log output more relevant:

    1. In the Search box, type “webframe” then hit Enter. It should create a filter for “Any” field that “Contains” the string “webframe”. Click the down arrow next to Any and update it to “Process”.

    2. Next, in the Search box, type “console” then hit Enter. It should create a filter for “Any” field that “Contains” the string “console”. Click the down arrow next to Any and update it to “Category”.

  7. Finally, either click “Start Streaming” from the main screen or click the “Start” button in the toolbar.

  8. At this point, Console should now be streaming log output from WebFrame, filtered to only show JavaScript console output as shown below.


TOP


Safari Developer Tools Debugging

If you notice that your site isn’t running as expected in WebFrame, you can use Safari Developer tools on a Mac to inspect the site loaded in WebFrame Pro.  Here’s how that can be done:

First, configure your iOS/iPadOS device:

  • Go to Settings -> Safari - > Advanced

  • Enable “Web Inspector”

  • Open WebFrame 

Next, configure your Mac:

  • Open Safari

  • If Developer tools aren’t already enabled, so to Settings -> Advanced

    • Check “Show Develop menu in menu bar”

    • Close Settings

To inspect web content running in WebFrame:

  • Attach iPad to Mac with cable

  • If prompted, allow devices to trust each other

  • In Safari on the Mac, click “Develop” in the menu bar

  • In the second section of the Develop dropdown menu, you should see the name of the attached iOS/iPadOS device

  • Select it to open the sub-menu

  • The sub-menu should list the name of the current page being displayed in WebFrame

  • Click on the page name to use Web Inspector on that page


FAQ

So it’s just a webpage?
No, WebFrame is not just a webpage. It is a browser specifically designed to be configured as a kiosk for iOS devices, with features target to ensure the best possible experience, usability, manageability, and security for a kiosk implementaiton.

What kind of content can I display?
WebFrame is built on WebKit, the same engine that powers Safari. In general, if Safari can display something without the need for a plug-in, then WebFrame can display the same content. In general, we recommend websites, web apps, documents, and multimedia (in iOS natively supported formats).

Can WebFrame be managed?
WebFrame Kiosk and WebFrame Pro Kiosk can both be managed locally in the iOS Settings app. WebFrame Kiosk Pro can be managed remotely through EMM/MDM solutions that support the AppConfig standard.

Why doesn’t it have a navigation bar?
The intent for WebFrame is to provide a full-screen experience so that users are immersed the experience you define. It is also important to keep users in the experience you curate. A navigation bar would detract from both of those goals. However, in the future we are looking at options to allow a configurable navigation bar for customers that want to provide a more open experience.

How do I deploy in an enterprise?
WebFrame can be deployed through Apple’s Volume Purchase Program for enterprise or education. We recommend deploying WebFrame Kiosk Pro, since it can also be remotely configured at enterprise scale, whereas WebFrame Kiosk can only be managed locally through the iOS Settings app.

Can I change the app icon?
Currently, no, but this is something we’re investigating. If you are interested in a custom version of WebFrame that includes custom icons, hard-coded URLs, etc., please contact us.


TOP